Back to TheWorxHub for Senior Living Main Menu
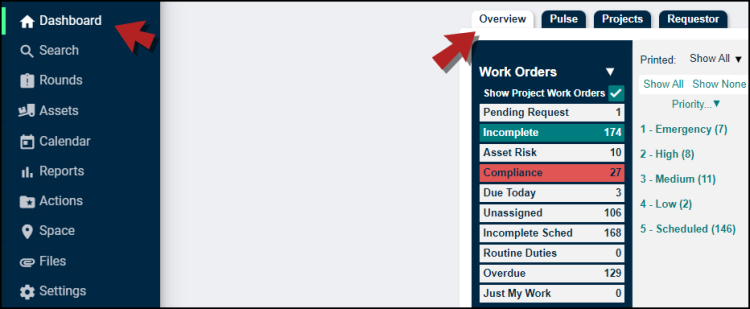
Dashboard Overview
TheWorxHub Dashboard shows the details of your department that need attention at any given moment of time.
To access TheWorxHub Dashboard:
- Click on the Dashboard tab and then on the Overview tab.
Watch the Video Tutorial:

Work Orders and Reminders
- The Work Orders and Reminders sections of your Overview tab is broken down into categories to help you easily manage the work, tasks, and important information at your organization.
- Click on the category to populate those records in the records list to the right.
- Uncheck the box next to Show Project Work Orders if you do not want to include any work orders belonging to a project.
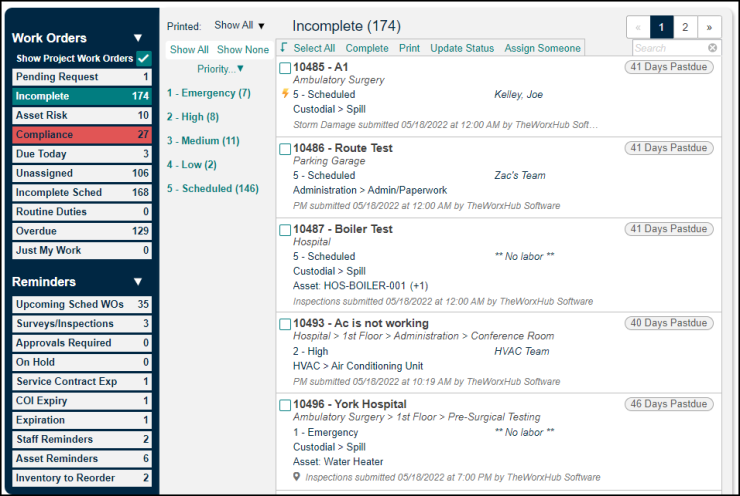
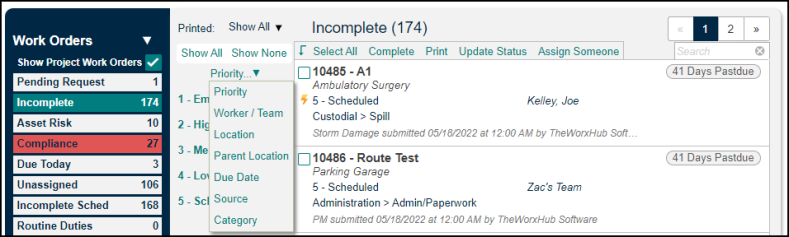
Filtering Records
- Use the drill down column to filter out the records in a selected category.
- Click Show All to remove any previously selected filter options.
- Click Show None to apply all filters. This may be useful if you only have one or two filters you want to apply to your data. After clicking Show None, click on only the items you want to show.
- Click the down arrow next to the default filter field to select the field you would like to filter by. *Note: The list of filtering options will vary depending on the category that is selected.
- Click any items you do not want displayed in the list of records. These filters then appear with a strike through mark.
- You can click on the strike through item again to include those records in the records list.
- Each record shows an abbreviated view of the work order. Hover over the work order with your mouse to show common actions, such as completing the work or entering labor time.
- Click on the work order description to be taken to the full work order form.
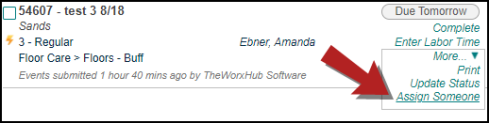
Reassigning Work
From the dashboard, you can easily reassign a single work order to another staff member or team when necessary. You can also reassign multiple work orders in a batch.
-
From the Overview tab, hover over the work order that needs to be reassigned.
-
Click the More drop-down that appears and select Assign Someone.
-
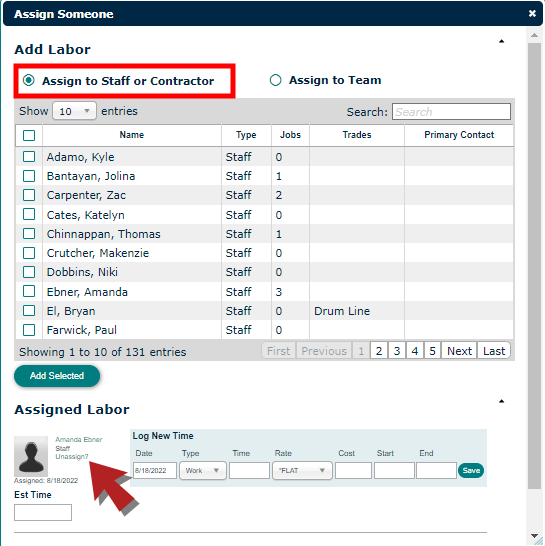
In the window appears, click the Unassign? link next to the staff member(s) who should be unassigned from the work order.
-
If you are removing the assignment from a team, click the Remove Team link.
-
-
Select the Assign to Staff or Contractor option to assign to an individual user.
-
If assigning to a team, select the Assign to Team option.
-
-
Check the box next to the staff member(s) you wish to add and click on the Add Selected button.
-
If assigning to a team, click Add next to the team you want to assign. *Note: Only one team can be assigned to a work order at one time.
-
-
Click Save to reassign the work order.
Quick Completing a Work Order
Utilize the Quick Complete feature for work orders on your dashboard that have a lightning bolt icon ( ). The lightning bolt indicates that all required information has been entered and the work order can be marked complete quickly. If the lightning bolt icon is not displayed on a work order, you will need to add more information to the work order before you are able to mark it complete.
-
From your Dashboard on the Overview tab, click the Incomplete category.
-
Hover over a work order marked with a lightning bolt and click the Complete link that appears.

-
In the pop-up window, enter any appropriate information:
-
Log Time is required if you have initially configured the Work Order Settings to Require Labor Time, or the work order cannot be completed. *Note: If there is no labor time logged, the work order is not eligible for quick complete. If you click on the Complete link, it will open the Completion Wizard.
-
Check to make sure the correct Rate Type is selected for your time.
-
Add a Note about the work that was done.
-
The Date and Time of completion will be filled in for you.
-
Check the Visible to Requestor box to alert the requestor of your update.
-
Check the Bill to Resident? box if applicable.
-
-
Click the Complete button to save the update. This removes the work order from the Incomplete category on your Overview tab.
-
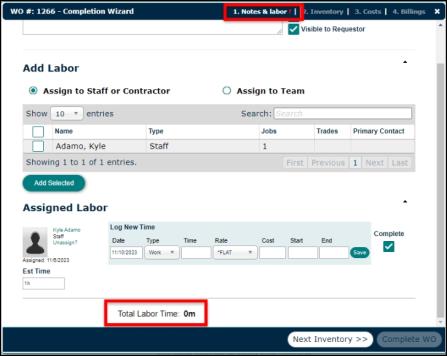
To complete a work order without a lightning bolt icon, access the Completion Wizard to add the required information for completion.
On desktop, if the Require Labor Time setting is checked and no labor time is logged the Completion Wizard will open:
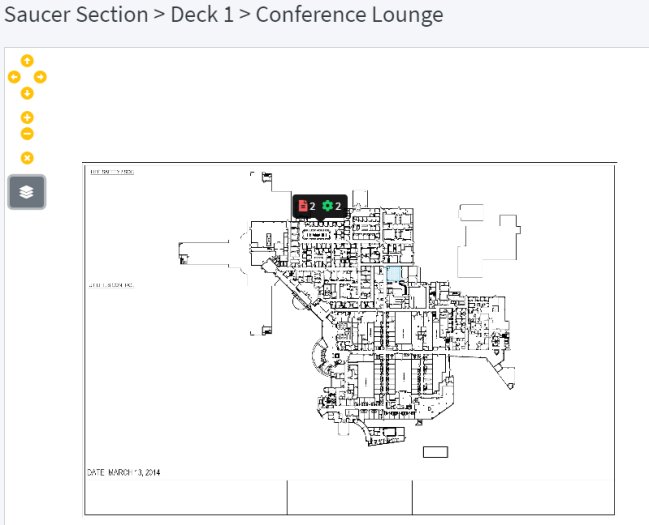
Space Management on the Dashboard
Users of TheWorxHub can utilize portions of Space Management from the work order list on the Dashboard. You can access drawings, view nearby work and assets, and other layers.
To access drawings:
- From the work order list, click on the map pin icon (
 ) on a work order. A side panel will expand to display the location of the work order on the appropriate drawing.
 - Use the yellow arrow and zoom icons or click and drag to move the drawing as needed.
- Click on the Layers icon (
 ) to expand the menu:
- Flip the Show Open Work toggle to display all open work close to the location of this work order.
- Flip the Show Assets toggle to display assets in locations close to the location of this work order.
- Flip the toggle of other available layers to display them as needed.
- Click outside of the panel to return to TheWorxHub Dashboard.